Tuesday, November 6, 2012

Pallet Wood Sign

Here are a few pictures of the new sign I made. I was planning on hanging it in our house, but this one will be for sale in my Etsy shop as soon as I open it up! Enjoy:)


Photobucket


Photobucket


Photobucket


Photobucket


Photobucket


Photobucket


Photobucket

Happy Tuesday!


Beyond The Picket Fence

Sunday, November 4, 2012

Cable Reel Side Table

Today was supposed to be a lazy Sunday, but sense the husband is gone I figured I'd take some time to do some projects. This one wasn't on the list, I was on Pinterest and saw this post from Bliss ranch and fell in love! I had been wanting to redo our cable reel side table we pulled out of the wood pile awhile back, but I didn't know what I wanted to do with it. Here it is before:

Photobucket

We cleaned it, sanded the heck out of it, stained and sealed it and it's been sitting in our living room sense. Her she is today:
Photobucket

I wish you guys could see this baby in person, pictures just do not do it justice! If you want to see the transformation, keep reading.
Warning: Lots of pictures in this post!

Photobucket

I printed off what I wanted it to say and layed it on the table where I liked it.

Photobucket

Then using a black pen, I traced each letter till my arm hurt!

Photobucket

Using a black Sharpie marker (I love these things), I filled the letters. I never make them perfect sense they will be sanded anyway.

Photobucket

I didn't do heavy sanding, just light on the edges and the letters. I usually stop here, but she didn't look right to me just yet.

Photobucket

So I took some basic acrylic paint and dry brushed.

Photobucket

Now Im starting to love her!

Photobucket

Sealed her with my Polyurethane semi-gloss sealer sense she will be used (and beat up by my 2 year old) daily.

Photobucket 

Photobucket Photobucket

Photobucket

Price:   Cable reel-free
                 Paint- already had
                              Stencils- made from printer

Total Cost: FREE!


PS: I have been getting a lot of questions asking how I do my letters. I have been contemplating on making a video for my blog showing you guys exactly how it is done so stay tuned!


           Beyond The Picket Fence


Beyond The Picket Fence

Sunday, October 28, 2012

DIY Fall Blocks

I threw together a quick fall project this morning. Only took me about an hour total, and free!!

I cut some 2x4's, sanded them, threw on some stain and paint. I printed the letters off then just traced them onto the wood and filled them in. I used rope for the stem of the pumpkin and paint it brown, added a leaf and twine. I finished them off with a little distressing and I was finished!


Photobucket

Photobucket

Happy Creating!

Saturday, October 20, 2012

DIY Zombie Dog from Christmas Reindeer

Today I am going to show you guys the progress I have made on our Zombie dog! My husband is a K9 handler and for Halloween were wanted to make a zombie dog. He isnt 100% finished yet, Ill snap some pictures the day he is used so you guys can see the finished look. But he was super cheap and easy to make so I hope you guys are ready to see an amazing transformation!

Photobucket

We took the body of a yard horse (used for Christmas, a reindeer will also work), and removed the lights, and moved some of the pieces around to look more like a dog. Then we stuffed him with newspaper, and secured it in with duct tape.

Photobucket

Making some progress...

Photobucket

I used some cardboard to make pointy ears (We were going for a German Shepard). Now this was a complete trial and error kind of project. He looks very much like a donkey right here. I was getting a little nervous...

Photobucket

Some of these pictures are off our phones so Im sorry for the bad quality! Next step was to paper mache the whole body and let him dry over night.

Photobucket

Then came the FUN part! I started making the nasty looking cuts and open wounds. The ribs are made from hangers covered in little cardboard tubes, and then covered in saran wrap. The blood was a recipe my husband cooked up (literally), i have no idea whats in it! And around the wounds and the ribs I did a oatmeal and gelation mixture. After it dries it feels like rubber, very cool!

Photobucket

For the first layer of oatmeal and gelation, I added a cream color to look like flesh, and the second time I added some fake blood.

Photobucket

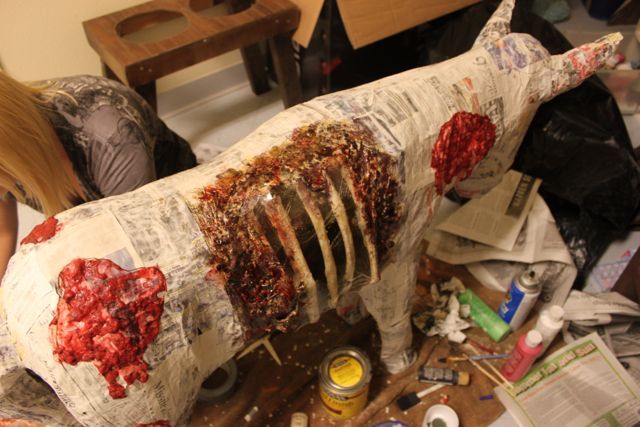
I added some red and some wood stain to give it some color.

Photobucket

Now its time to work on the face!

Photobucket

I decided to cover the face in a clay mixture (2 cups flour, 1 cup salt and water). I made a few wounds on the face in the clay as well.  

In this picture and the one above it you can kinda see the rest of the body how its covered in "fur." I didn't get any picture of this step, but we couldn't figure out how to give the dog hair (without spending a ton of money), so we tried a few things. We went with cotton balls, yes I said cotton balls! I covered a small area with some hot glue and pressed a cotton ball into then pulled straight up and it worked out really well.

Photobucket

Next we just spray painted the dog brown, black and white.

Photobucket

I made some eyes and teeth out of the same clay mixture, and let them dry over night. Then I hot glued them in and added some red paint for blood.

Photobucket

And here he is! I am really happy with the way he turned out. The night of our Trunks for Treats, and Halloween his wounds will be covered in fake blood. Ill be sure to snap some picture and update.

Photobucket

His face is my favorite. I wasn't sure if i should paint his eyes, but the white really makes him pop!

Hope you guys enjoyed, he took us about 3 weeks to finish and I cant wait to show him off.
Happy Halloween decorating!!

Super Cheap Fall Mirror


Last night I wanted to redo the mirror in our bedroom, Fall is one of my favorite times of year, (besides Christmas) so I decided to make a Fall inspired mirror to put up. It didn't cost me a penny and only took an hour to make! All you need is some cardboard, hot glue gun, rope, twine, and a little round mirror. Hobby Lobby usually has these for 50% off every other week. Let;s get started!

Photobucket

Start by cutting a circle out of cardboard. It dosent have to be perfect, the leaves will make it look round. 


Photobucket

Next start hot gluing your leaves. (NOTE: For tips on how bring nature inside hop on over to The Frugal Homemaker.)

Photobucket


Photobucket

I only had to do about 3 laps before I was ready to add my mirror.

Photobucket

Next I wrapped some rope in twine. Feel free to your rope if you would like to, the twine just working better with the colors of my leaves.

Photobucket

Hot glue in place, and your finished! Mine was very light, so i just added a little twine loop to the back to hang it with.


Photobucket


Photobucket

I tried it out in a few different places around the house.

Photobucket

Happy Crafting!